When a bathroom starts leaking, the visible damage often feels sudden — loose tiles, swollen cabinetry or a damp patch on the ceiling below. In reality, most waterproofing systems give away quieter clues weeks or even months earlier. Catching those clues quickly can mean the difference between a simple patch and a full strip-out. If you suspect deeper moisture issues, a licensed applicator can inspect, isolate the cause and re-seal the area with professional bathroom waterproofing methods that meet the current NCC and AS 3740 standards. First, let’s look at the warning signs homeowners often overlook.
Why Early Detection Beats Costly Repairs
Small leaks rarely stay small. Water tracks along grout lines and penetrates timber framing, plasterboard and electrical points. Left alone, moisture can:
- Undermine tile adhesion, leading to drummy or hollow sounds
- Trigger mould growth that discolours silicon and impacts indoor air quality
- Cause framing timbers to swell, warp or lose structural strength
- Create a hidden rot that invites termites into damp timber
- Shorten the service life of waterproofing membranes by years
Sydney’s humid summers, combined with quick temperature swings that cause condensation, give moisture extra staying power. Spotting issues early can avoid ripping out waterproofing, tiles and fixtures that were otherwise sound.
The 8 Warning Signs Explained
1. Persistent Musty Odours
A damp, earthy smell that lingers after the room has aired often points to trapped moisture under tiles or behind wall linings. Because odours travel through the tiniest gaps, this sign can appear before visual staining. Take note if the smell returns shortly after cleaning or ventilating.
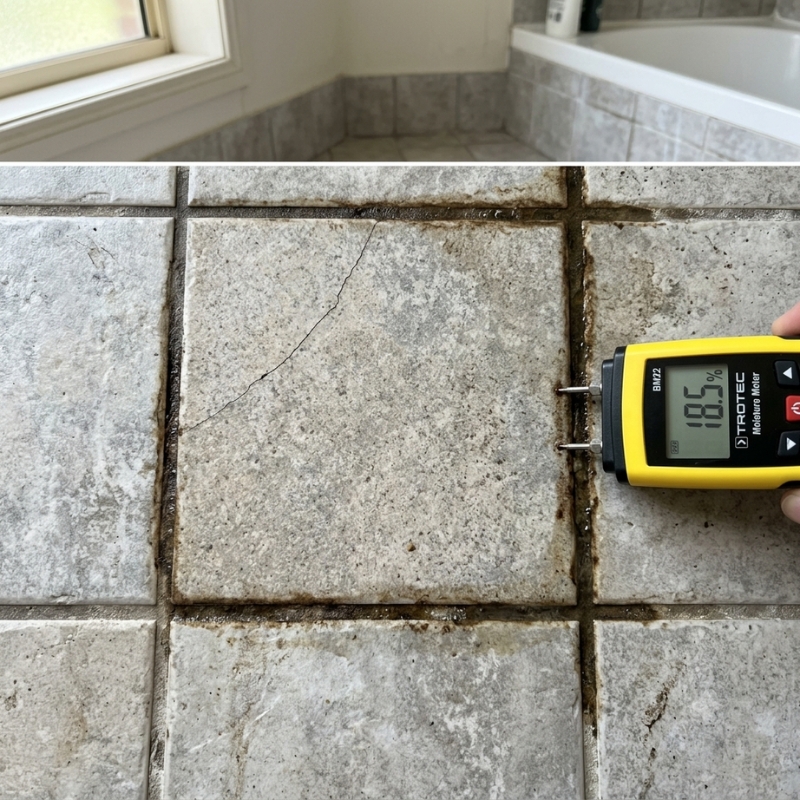
2. Darkening or Discoloured Grout Lines
Grout acts like a sponge. When moisture reaches the bedding layer underneath, capillary action can draw mineral-laden water up through the joints, leaving darker patches or rusty tones. Compare areas around fixtures such as taps and shower niches where water pools longest.
3. Hairline Cracks in Tiles or Corners
Fine cracks along wall-to-floor junctions, shower hob corners or across large format tiles may signal movement in the substrate caused by swelling wet timber or deteriorating adhesive. While a surface crack looks minor, it can open a path for further water ingress.
4. Peeling or Bubbling Paint on Adjacent Walls or Ceilings
Moisture migrating beyond the tiled area often shows up as blistering paint, swelling plasterboard or staining on the ceiling below an upstairs bathroom. If repainting covers the blemish but it reappears within weeks, suspect waterproofing failure rather than a simple ventilation issue.
5. Swollen or Spongy Skirting Boards and Door Frames
Timber trims start to swell, warp or feel soft when they absorb repeated splashes or airborne moisture escaping through failed joint seals. In bathrooms with MDF skirting, a swollen profile almost always indicates ongoing dampness behind the tiles.
6. Efflorescence: White Powdery Deposits
Salty or chalky crystals forming on grout lines, tile surfaces or along external brickwork behind a wet area point to water dissolving soluble salts and redepositing them as it evaporates. Efflorescence means moisture is moving through, not sitting on, the surface.
7. Mould Returning Within Days of Cleaning
All bathrooms battle mould, but if it reappears almost immediately after thorough cleaning and adequate ventilation, hidden moisture is feeding spores from behind the surface. Look closely at silicone in shower corners and behind flexible sealant along the bath rim.
8. Loose Tapware, Fixtures or Lifting Silicone
When fixtures feel wobbly, or silicon edges begin to pull away without mechanical stress, the adhesive beneath may be deteriorating due to constant moisture. Lifting edges create channels that turbo-charge water ingress every time you shower.
Quick-Reference Table: Minor vs Serious Moisture Signs
Below is a snapshot to help decide whether monitoring, DIY sealing or professional intervention is the safer move.
| Situation | What It May Mean | Suggested Next Step |
| Slight grout discolouration in one shower corner | Early moisture penetration, the membrane may still be mostly intact | Clean, re-seal grout, monitor for change |
| Persistent musty odour plus mould returning quickly | Ongoing dampness behind tiles | Arrange moisture meter testing and membrane check |
| Cracks at the wall-to-floor junction are spreading | Substrate movement and probable membrane breach | Engage a licensed waterproofing professional |
| Swollen skirting, paint bubbles on the ceiling below | Water escaping wet area envelope | Stop shower use, book inspection, plan strip-out and re-waterproof |
Even with “minor” signs, if more than one symptom appears simultaneously, a deeper investigation is wise.
DIY Checks vs Professional Assessment
Homeowners can perform simple checks: tap tiles to listen for hollow sounds, place tissue at suspected leak points and watch for damp patches, or use an affordable moisture meter on wall linings. However, identifying the exact breach location often requires removing a tile, pressure testing plumbing, or using thermal imaging. Because NSW regulations classify waterproofing as specialist work, any repair beyond surface re-sealing must be completed or certified by a licensed contractor. The NSW Fair Trading waterproofing licence guidelines outline who can legally carry out membrane application and issue compliance paperwork.
Common Mistakes That Mask, Not Fix, Waterproofing Failures
- Painting over mould with bathroom paint that contains fungicides
- Re-siliconing joints without checking if the substrate underneath is dry
- Re-grouting cracked tiles while the adhesive bed underneath remains saturated
- Applying a thin “membrane repair” product over shiny glazed tiles instead of roughening and priming first
These shortcuts can trap moisture in place, leading to rot or rust behind the surface. For a deeper look at how long membranes should last and why they sometimes fail prematurely, see our guide on how long waterproofing membranes last.
Sydney Climate Factors That Accelerate Bathroom Moisture Damage
Sydney’s coastal climate delivers high humidity, sea-salt-laden air and rapid shifts between hot summer days and cooler evenings. Those swings cause materials to expand and contract, stressing sealant joints. In older suburbs like Bondi or Manly where many bathrooms sit on suspended timber floors, daily humidity can push moist air through gaps in floorboards, feeding mould under the tiles. Homes without mechanical ventilation struggle even more during storm season when opening windows isn’t practical.
What to Do Next: A Step-by-Step Action Framework
- Identify which of the eight signs are present and note their location and severity.
- Reduce water exposure in the area. Use another bathroom if available.
- Document the issue with photos and short notes. This helps any contractor pinpoint likely entry points.
- Conduct basic DIY checks (tapping tiles, surface moisture testing) if you feel confident.
- Arrange a licensed waterproofing inspection if more than one moderate sign appears or if any structural timber looks affected.
- Ask for a written scope of works explaining whether localised repairs or a full membrane replacement is recommended.
- Verify that repair methods comply with AS 3740 and the National Construction Code.
- Keep records of compliance certificates and warranties for future property sales or insurance claims.
Frequently Asked Questions
1. Can I just re-grout my shower to stop leaks?
Re-grouting can seal minor surface gaps, but it will not repair a compromised membrane underneath. If leaks continue after re-grouting, the issue is almost certainly deeper.
2. How long should a modern waterproofing membrane last?
Well-installed membranes typically last 10–15 years in normal conditions, sometimes longer. Premature failure often links back to movement cracks, poor surface prep or incorrect product choice.
3. Will home insurance cover bathroom waterproofing repairs?
Policies differ. Insurers usually cover resultant water damage but not the faulty workmanship that caused it. Check your PDS and speak with your insurer before authorising works.
4. Is mould always a sign of waterproofing failure?
Not always. Bathrooms with poor ventilation can grow mould on surface condensation alone. Persistent or rapidly returning mould after thorough cleaning, however, suggests hidden dampness.
5. Do I need council approval to re-waterproof a bathroom in Sydney?
Most like-for-like waterproofing repairs fall under exempt development, but major structural changes may need approval. Your waterproofing contractor or builder can advise based on the scope.
Final Thoughts
Catching bathroom waterproofing problems early is far less disruptive than replacing swollen joists or chasing leaks through multiple floors. If two or more of the warning signs on this list are showing up, monitoring alone may not be enough. A licensed assessment can confirm whether a targeted repair or a complete membrane renewal is the safer long-term fix.